
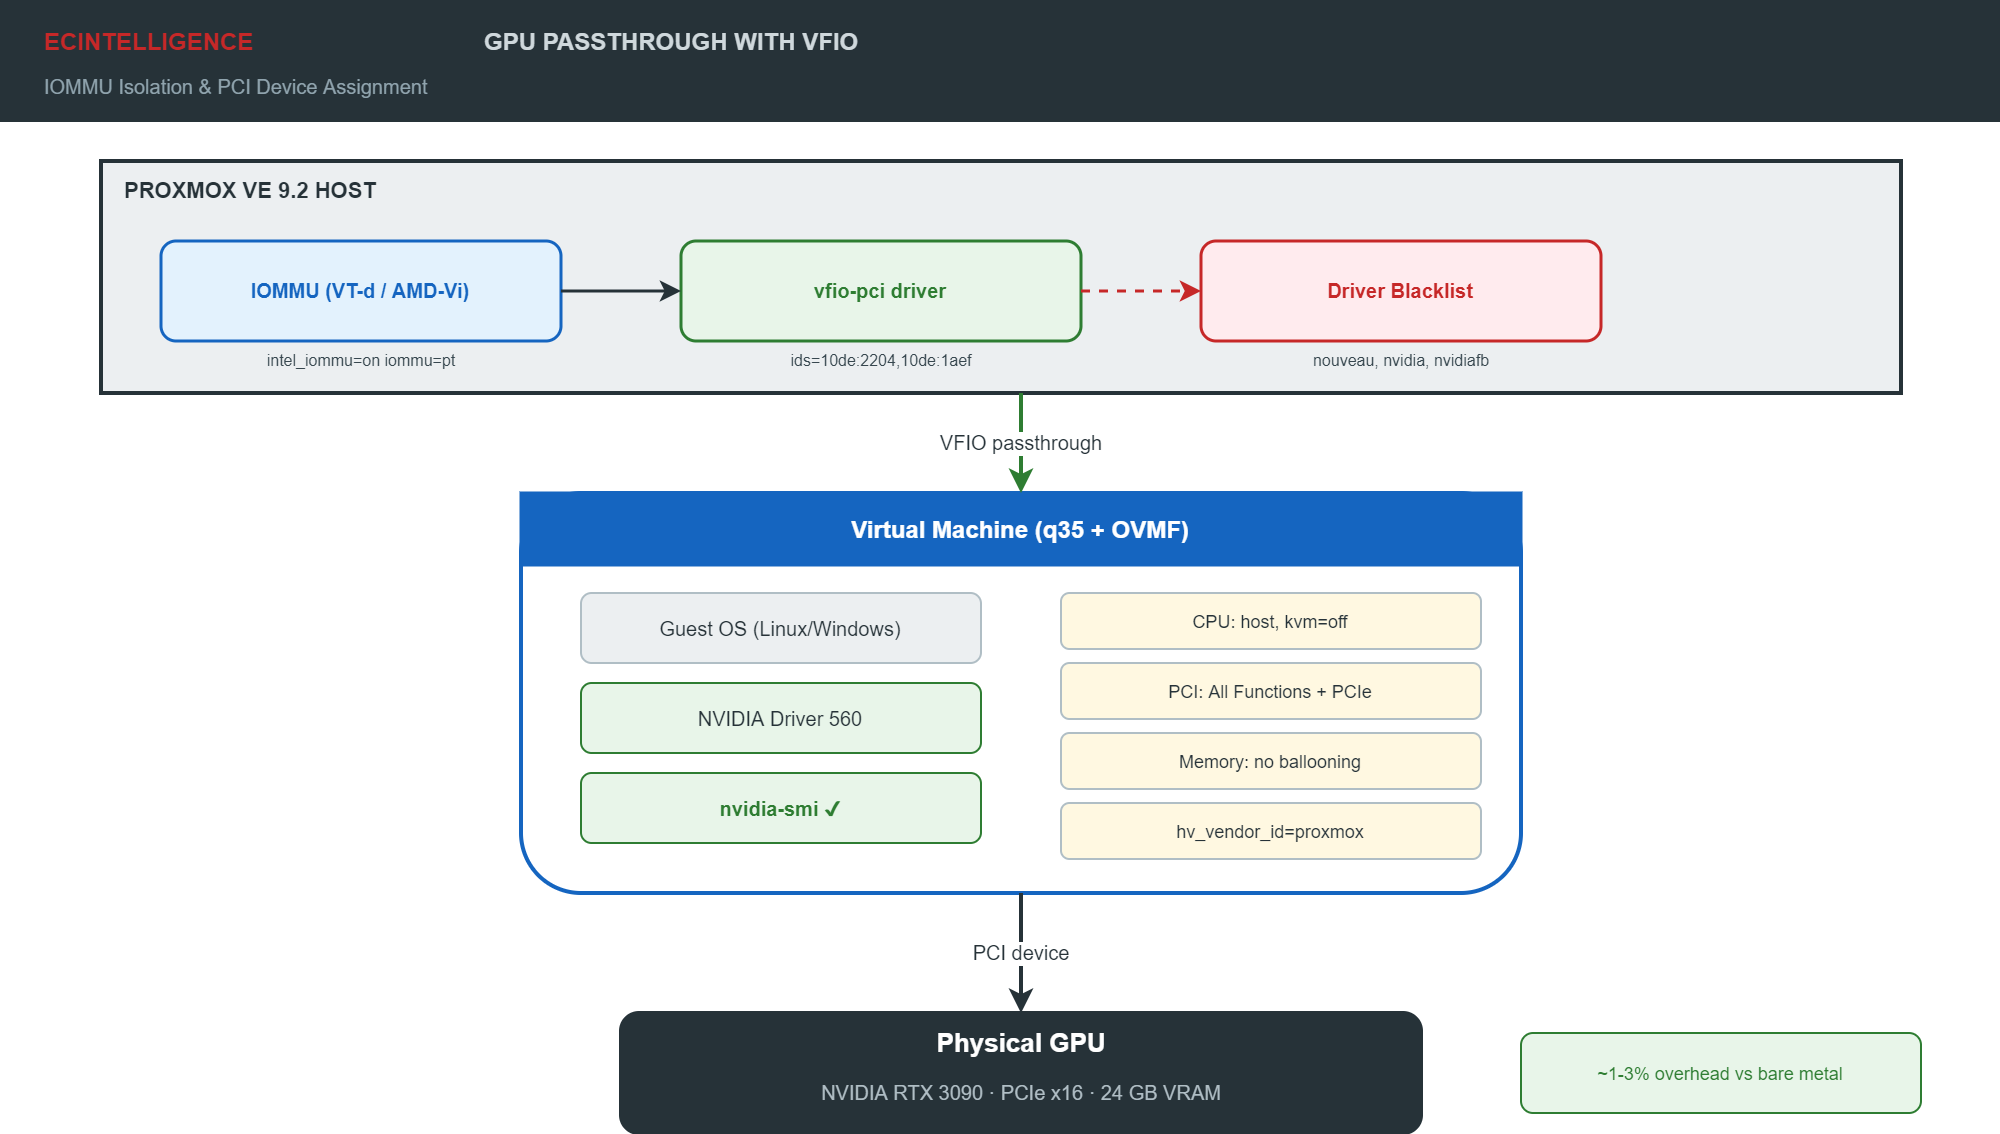
This guided exercise extends the VM management module of our Proxmox VE training. For a comparison of passthrough, vGPU, and MIG approaches, see Passthrough, vGPU ou MIG.
Guided Exercise: GPU Passthrough on Proxmox VE 9 with VFIO
Pass a physical NVIDIA or AMD GPU through to a virtual machine on Proxmox VE 9.2 using VFIO. The VM gets exclusive, near-bare-metal access to the GPU. At the end of this exercise, nvidia-smi (or rocm-smi) runs inside the guest and reports the full GPU.
Outcomes
At the end of this exercise, you will be able to:
- Enable IOMMU on an Intel or AMD host and verify IOMMU group isolation.
- Bind a GPU to the
vfio-pcidriver so the host releases it for passthrough. - Create a Proxmox VM configured for PCI passthrough (q35, OVMF, CPU host).
- Attach the GPU to the VM and install the vendor driver inside the guest.
- Verify GPU access with
nvidia-smiorrocm-smifrom within the VM.
Prerequisites
- A Proxmox VE 9.2 node with a discrete GPU installed in a PCIe slot.
- A CPU that supports IOMMU: Intel VT-d or AMD-Vi. Virtually all CPUs manufactured after 2015 support this.
- IOMMU enabled in the BIOS/UEFI firmware. The setting is often under Chipset, Northbridge, or Advanced CPU Configuration. Intel boards label it VT-d; AMD boards label it AMD-Vi or IOMMU.
- Two GPUs recommended: one for the Proxmox host console (integrated graphics or a basic card) and the discrete GPU for passthrough. Single-GPU passthrough is possible but significantly more fragile and is not covered in this exercise.
This exercise uses an NVIDIA GPU as the example. The IOMMU and VFIO steps are identical for AMD GPUs; only the driver blacklist and guest driver differ. AMD-specific notes are included where the steps diverge.
Instructions
1. Enable IOMMU in the boot parameters
Even with IOMMU enabled in the BIOS, Linux does not activate it unless instructed via kernel parameters.
1.1. Edit the GRUB configuration.
root@pve-node1:~# nano /etc/default/grub
Find the line starting with GRUB_CMDLINE_LINUX_DEFAULT. Add the IOMMU parameters:
For Intel CPUs:
GRUB_CMDLINE_LINUX_DEFAULT="quiet intel_iommu=on iommu=pt"
For AMD CPUs:
GRUB_CMDLINE_LINUX_DEFAULT="quiet amd_iommu=on iommu=pt"
The iommu=pt flag (passthrough mode) improves performance by applying IOMMU translation only to devices actually being passed through, not to every device on the bus.
1.2. Update GRUB and reboot.
root@pve-node1:~# update-grub
root@pve-node1:~# reboot
1.3. Verify IOMMU is active after reboot.
root@pve-node1:~# dmesg | grep -i -e DMAR -e IOMMU | head -5
You must see lines confirming IOMMU is enabled. On Intel systems, look for DMAR: IOMMU enabled. On AMD systems, look for AMD-Vi: Found IOMMU. If neither appears, IOMMU is not enabled in BIOS — go back and check the firmware settings.
2. Load VFIO kernel modules
VFIO is the kernel framework that isolates the GPU from the host and presents it to the VM. On Proxmox VE 9.2 (kernel 7.0), the vfio_virqfd module is merged into vfio, so you only need four modules.
2.1. Add the VFIO modules to the initramfs.
root@pve-node1:~# cat /etc/modules-load.d/vfio.conf
vfio
vfio_iommu_type1
vfio_pci
Create or edit /etc/modules-load.d/vfio.conf with exactly those three lines.
3. Identify the GPU and its PCI IDs
3.1. List PCI devices to find your GPU.
root@pve-node1:~# lspci -nn | grep -i nvidia
Example output:
01:00.0 VGA compatible controller [0300]: NVIDIA Corporation GA102 [GeForce RTX 3090] [10de:2204] (rev a1)
01:00.1 Audio device [0403]: NVIDIA Corporation GA102 High Definition Audio Controller [10de:1aef] (rev a1)
Two IDs appear: 10de:2204 for the GPU and 10de:1aef for its HDMI audio controller. Both share the same IOMMU group and both must be passed through together.
For AMD GPUs: replace nvidia with amd in the grep command. AMD cards also have a VGA function and an audio function.
3.2. Verify the IOMMU group is clean.
Run the following script to list all devices in each IOMMU group:
for d in /sys/kernel/iommu_groups/*/devices/*; do
  n=$(basename $(dirname $(dirname "$d")))
  echo "IOMMU Group $n: $(lspci -nns ${d##*/})"
done | grep -i nvidia
The GPU and its audio controller must be in the same group, ideally alone. If they share a group with unrelated devices (a USB controller or SATA controller), move the GPU to a different PCIe slot or research ACS override patches (not covered here).
4. Bind the GPU to vfio-pci
The host must release the GPU so VFIO can claim it. This means blacklisting the host drivers and telling vfio-pci to grab the GPU by its PCI IDs at boot.
4.1. Blacklist the host GPU drivers.
Create /etc/modprobe.d/gpu-blacklist.conf:
blacklist nouveau
blacklist nvidia
blacklist nvidiafb
blacklist nvidia_drm
For AMD GPUs: blacklist amdgpu and radeon instead.
4.2. Configure vfio-pci to claim the GPU.
Create /etc/modprobe.d/vfio-pci.conf using the PCI IDs from step 3.1:
options vfio-pci ids=10de:2204,10de:1aef disable_vga=1
Replace the IDs with your actual GPU and audio device IDs. The disable_vga=1 flag prevents the GPU from initializing as a VGA device on the host, which avoids conflicts on single-GPU setups.
4.3. Rebuild the initramfs and reboot.
root@pve-node1:~# update-initramfs -u -k all
root@pve-node1:~# reboot
4.4. Verify the GPU is bound to vfio-pci.
After reboot:
root@pve-node1:~# lspci -nnk -s 01:00
Look for Kernel driver in use: vfio-pci on both the VGA and audio functions. If it still shows nvidia or nouveau, the blacklist or the vfio-pci IDs are incorrect — review steps 4.1 and 4.2.
5. Create the VM for GPU passthrough
The VM must be configured with specific settings for passthrough to work.
5.1. Create a new VM in the web UI.
Open https://<node-ip>:8006 and create a new VM with these settings:
- System tab: Machine type
q35, BIOSOVMF (UEFI), add an EFI disk. The q35 chipset provides native PCIe support required for passthrough. - CPU tab: Type
host. This exposes the physical CPU features to the guest, which GPU drivers often require. - Memory tab: allocate at least 8 GB. Disable ballooning (uncheck
Ballooning Device): ballooned memory does not work reliably with passthrough devices because they require fixed memory mappings.
5.2. Add the GPU as a PCI device.
In the VM’s Hardware tab, click Add → PCI Device.
- Select your GPU from the dropdown (it appears with its PCI address, e.g.,
0000:01:00.0). - Check All Functions: this passes through both the VGA and audio functions together.
- Check PCI-Express: this presents the device as a PCIe device to the guest instead of legacy PCI.
- Check Primary GPU if you want the VM to use this GPU as its display output.
5.3. NVIDIA-specific: prevent driver Error 43.
NVIDIA consumer drivers (GeForce) detect hypervisors and refuse to load with Error 43. To work around this, edit the VM configuration file directly:
root@pve-node1:~# nano /etc/pve/qemu-server/<vmid>.conf
Add the following line:
args: -cpu host,kvm=off,hv_vendor_id=proxmox
The kvm=off flag hides the KVM hypervisor signature. The hv_vendor_id sets a neutral vendor ID. Together they prevent the NVIDIA driver from detecting virtualization.
Note: Datacenter GPUs (Tesla, A100, L40S, H100) and recent NVIDIA drivers (version 550 and later) are less strict about this check. Test without the flag first; add it only if the driver fails to load.
6. Install the guest OS and GPU driver
6.1. Boot the VM and install the OS.
During the first boot, the GPU will not display anything until its driver is installed in the guest. Use the Proxmox Console tab (noVNC) for the OS installation. Once the OS is running, install the GPU driver.
6.2. Install the NVIDIA driver (Linux guest).
$ sudo apt update
$ sudo apt install nvidia-driver-560
Replace 560 with the current driver version for your GPU. Reboot the guest after installation.
For AMD GPUs (Linux guest): the amdgpu driver is included in the kernel. No separate installation is needed. For compute workloads, install ROCm from AMD’s repository.
6.3. Verify the GPU is visible inside the VM.
$ nvidia-smi
Expected output shows the GPU model, driver version, CUDA version, temperature, and memory usage. If nvidia-smi runs and reports the correct GPU, passthrough is working.
For a quick compute test, install Ollama and run a model:
$ curl -fsSL https://ollama.com/install.sh | sh
$ ollama run llama3.2:1b "Hello"
If Ollama detects the GPU (check ollama ps for GPU in the processor column), inference runs on the GPU with near-bare-metal throughput.
Troubleshooting
| Symptom | Cause | Fix |
|---|---|---|
VM fails to start: vfio: failed to setup container |
IOMMU not active or GPU not in a clean group | Verify dmesg | grep IOMMU and check IOMMU groups (step 3.2) |
nvidia-smi shows Error 43 |
NVIDIA driver detects hypervisor | Add args: -cpu host,kvm=off,hv_vendor_id=proxmox to VM config (step 5.3) |
| Host loses display after reboot | vfio-pci claimed the host GPU | The IDs in vfio-pci.conf match the wrong GPU. Boot in recovery, fix the IDs |
| GPU works but no audio | Audio function not passed through | Enable All Functions when adding the PCI device (step 5.2) |
| VM runs but GPU not detected in guest | VM not using q35 or OVMF | Recreate the VM with q35 machine type and UEFI BIOS (step 5.1) |
What this article does not cover
This exercise focuses on full PCI passthrough of a single GPU to a single VM. The following topics are addressed in separate articles or through our AI infrastructure practice:
- vGPU and NVIDIA MIG for sharing one GPU across multiple VMs.
- GPU passthrough to LXC containers.
- Single-GPU passthrough (no integrated graphics on the host).
- SR-IOV for network-style GPU partitioning on supported datacenter GPUs.
- CUDA and ROCm toolkit configuration for AI/ML workloads.
- VRAM sizing for inference workloads (VRAM arithmetic article).
Sources: Proxmox VE 9 Administration Guide, PCI(e) Passthrough chapter, pve.proxmox.com. VFIO documentation, kernel.org. EC INTELLIGENCE, Formation Administration Proxmox VE 9, Chapter 5, January 2026.