
This guided exercise covers day five of our five-day Proxmox VE training. The full program takes you from a single node to a production-ready hyperconverged cluster.
Guided Exercise: Deploying Ceph Inside Proxmox VE 9
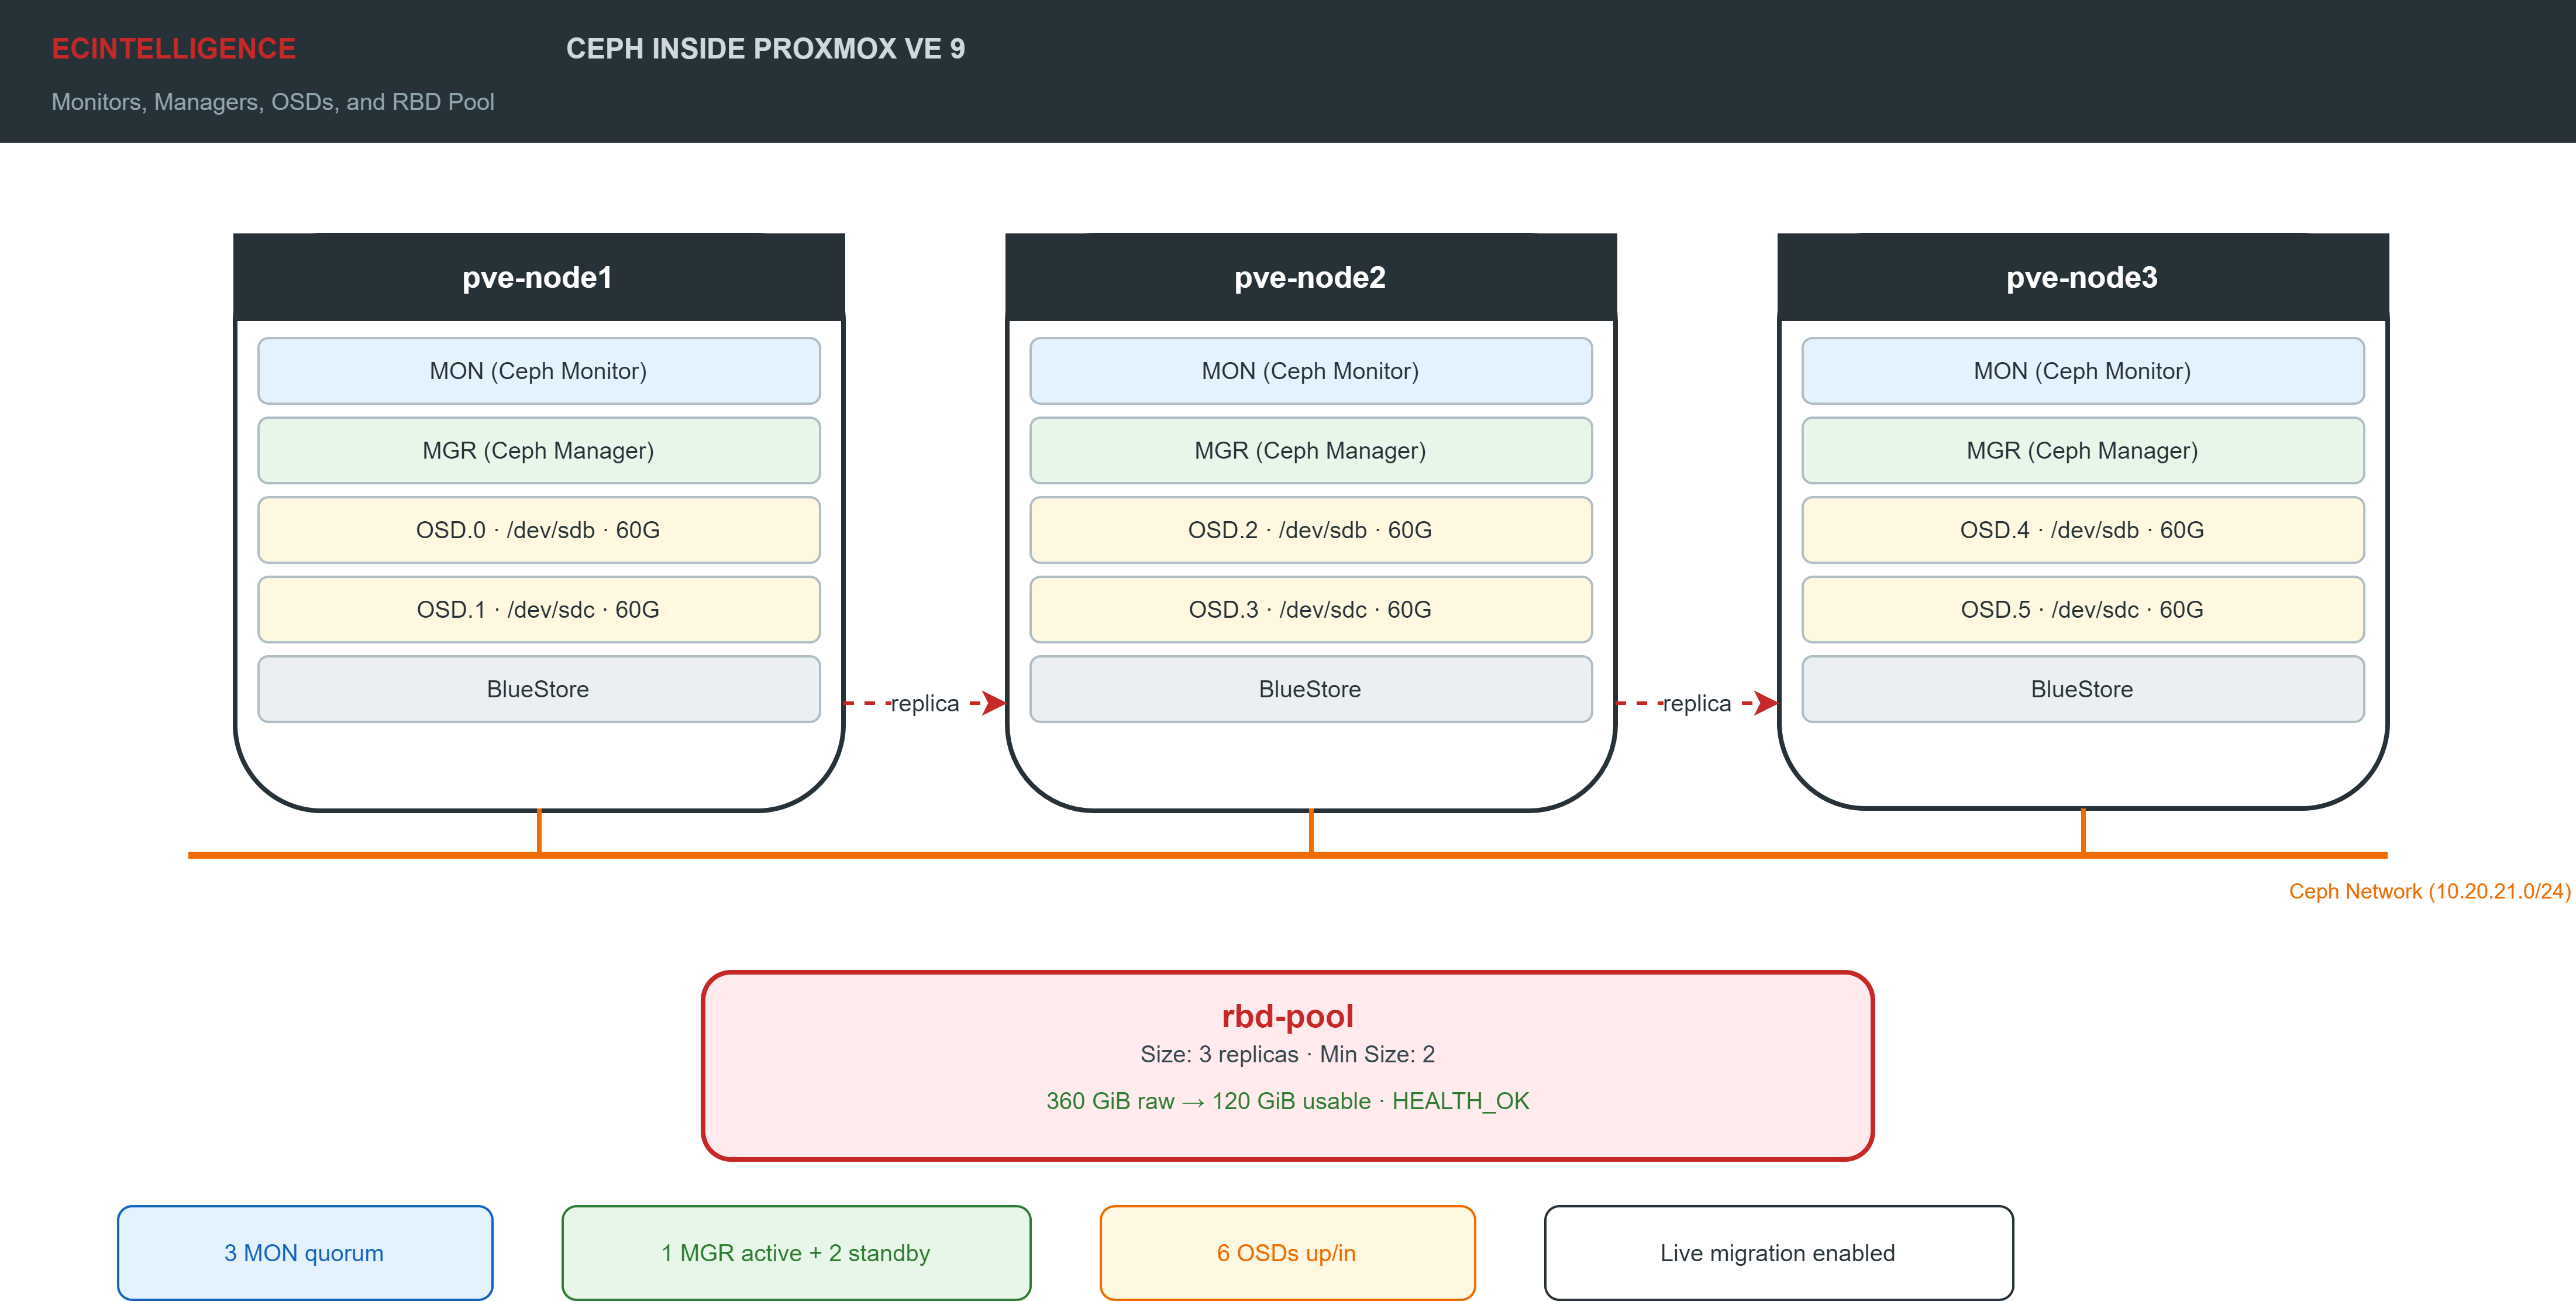
Deploy a distributed Ceph storage cluster across your three-node Proxmox VE cluster. When you finish this exercise, your VMs will have access to a replicated RBD pool accessible from every node, and live migration will work without external storage hardware.
Outcomes
At the end of this exercise, you will be able to:
- Install Ceph Tentacle packages on all three cluster nodes using
pveceph. - Initialize the Ceph cluster with a dedicated storage network.
- Deploy three monitors (MON) and three managers (MGR) for full redundancy.
- Create OSDs on dedicated disks across all nodes.
- Create an RBD pool with triple replication for VM storage.
- Verify cluster health with
ceph -s,ceph osd tree, andceph osd df.
Prerequisites
This exercise assumes you have:
- A working three-node Proxmox VE 9.2 cluster. If you do not have one, follow Building a Three-Node Proxmox VE 9 Cluster first.
- No-subscription repositories configured on all three nodes (repository setup guide).
- At least two unused disks on each node for Ceph OSDs. These disks must be completely empty with no partitions. The exercise uses
/dev/sdband/dev/sdcon each node. - A dedicated network or VLAN for Ceph traffic, separate from the cluster (Corosync) and management networks.
The addressing for this exercise is:
| Node | Management IP | Ceph Network IP |
|---|---|---|
| pve-node1 | 10.10.74.21 | 10.20.21.21 |
| pve-node2 | 10.10.74.22 | 10.20.21.22 |
| pve-node3 | 10.10.74.23 | 10.20.21.23 |
Replace these addresses with your own. The Ceph network (10.20.21.0/24 in this example) carries all OSD replication and client I/O traffic. It must be separate from the Corosync network to avoid contention during recovery events.
Instructions
1. Verify available disks
Before installing anything, confirm that each node has empty disks available for Ceph. Log in to each node as root and list the block devices.
1.1. Check disks on node 1.
root@pve-node1:~# lsblk | grep sd
sda      8:0    0  100G  0 disk
|-sda1   8:1    0 1007K  0 part
|-sda2   8:2    0    1G  0 part /boot/efi
|-sda3   8:3    0   99G  0 part
sdb      8:16   0   60G  0 disk
sdc      8:32   0   60G  0 disk
The disks sdb and sdc appear as raw disks with no partitions. These are the disks Ceph will use.
Important: If your disks show existing partitions or filesystem signatures, wipe them first with wipefs -a /dev/sdb. Ceph requires completely clean disks. The pveceph osd create command will refuse a disk that contains partitions or a filesystem.
1.2. Repeat on nodes 2 and 3.
Log in to pve-node2 and pve-node3 and verify that sdb and sdc (or your equivalent disks) are present and empty. All three nodes must have the same number of OSD disks for balanced data distribution.
2. Install Ceph on the first node
Ceph packages are not part of the default Proxmox VE installation. The pveceph install command downloads and installs them from the Proxmox repositories.
2.1. Install Ceph Tentacle on pve-node1.
root@pve-node1:~# pveceph install --repository no-subscription
The command downloads approximately 200 MB of packages. Wait for the installation to complete. The last line confirms success:
installed ceph tentacle 20.2 successfully!
Note: Proxmox VE 9.2 defaults to Ceph Tentacle (20.2.x). The previous release, Ceph Squid (19.2.x), remains available if you pass --version squid. Tentacle brings faster erasure-coded pools and improved BlueStore performance. For new deployments, Tentacle is the recommended choice.
3. Initialize the Ceph cluster
Initialization creates the Ceph configuration file, starts the first monitor (MON), and starts the first manager (MGR) on the current node.
3.1. Run pveceph init on pve-node1.
root@pve-node1:~# pveceph init --network 10.20.21.0/24
The --network parameter defines the Ceph public network. All monitor and OSD traffic will use this subnet. If you have a separate cluster-replication network, add --cluster-network 10.20.22.0/24 (in production, separating the public and cluster networks isolates client I/O from OSD replication traffic).
3.2. Verify the initial state.
root@pve-node1:~# ceph -s
Expected output shows HEALTH_WARN at this stage. This is normal: the cluster has only one monitor (quorum requires at least two) and no OSDs yet. The warnings disappear as you add components in the following steps.
4. Install Ceph on nodes 2 and 3
Ceph packages must be installed on every node that will run monitors, managers, or OSDs.
4.1. Install on pve-node2.
root@pve-node2:~# pveceph install --repository no-subscription
Wait for the installation to complete with the success message.
4.2. Install on pve-node3.
root@pve-node3:~# pveceph install --repository no-subscription
Important: Do not run pveceph init on nodes 2 and 3. The cluster was already initialized on node 1. Running init again would create a second, separate Ceph cluster. The other nodes join the existing cluster when you create monitors and OSDs on them.
5. Deploy monitors on all nodes
Monitors maintain the cluster map and enforce quorum. The first monitor was created automatically during initialization on node 1. You need to add monitors on nodes 2 and 3 to reach the minimum of three for a production-grade quorum.
5.1. Create the monitor on pve-node2.
root@pve-node2:~# pveceph mon create
The command creates a monitor daemon bound to the Ceph network address of this node (10.20.21.22 in this example).
5.2. Create the monitor on pve-node3.
root@pve-node3:~# pveceph mon create
5.3. Verify the monitor quorum.
From any node:
root@pve-node1:~# ceph mon stat
Expected output shows three monitors in quorum:
e3: 3 mons at {pve-node1=[v2:10.20.21.21:3300/0,v1:10.20.21.21:6789/0],
pve-node2=[v2:10.20.21.22:3300/0,v1:10.20.21.22:6789/0],
pve-node3=[v2:10.20.21.23:3300/0,v1:10.20.21.23:6789/0]},
election epoch 6, quorum 0,1,2 pve-node1,pve-node2,pve-node3
All three node names must appear in the quorum list.
6. Deploy managers on all nodes
Managers collect cluster statistics and serve the Ceph dashboard. One manager was created automatically on node 1 during initialization. Adding managers on nodes 2 and 3 provides failover: if the active manager goes down, a standby takes over within seconds.
6.1. Create the manager on pve-node2.
root@pve-node2:~# pveceph mgr create
6.2. Create the manager on pve-node3.
root@pve-node3:~# pveceph mgr create
6.3. Verify the managers.
root@pve-node1:~# ceph mgr stat
The output shows one active manager and two standbys. The active manager can be on any node.
7. Create OSDs on all nodes
Object Storage Daemons (OSDs) are the components that store data. Each OSD manages one physical disk. You will create two OSDs per node, six in total.
7.1. Create the OSDs on pve-node1.
root@pve-node1:~# pveceph osd create /dev/sdb
root@pve-node1:~# pveceph osd create /dev/sdc
Each command takes approximately 30 seconds. It partitions the disk, formats it with BlueStore, starts the OSD daemon, and registers it in the CRUSH map.
7.2. Create the OSDs on pve-node2.
root@pve-node2:~# pveceph osd create /dev/sdb
root@pve-node2:~# pveceph osd create /dev/sdc
7.3. Create the OSDs on pve-node3.
root@pve-node3:~# pveceph osd create /dev/sdb
root@pve-node3:~# pveceph osd create /dev/sdc
7.4. Verify all OSDs.
root@pve-node1:~# ceph osd tree
Expected output shows six OSDs distributed across three hosts:
ID  CLASS  WEIGHT   TYPE NAME           STATUS  REWEIGHT  PRI-AFF
-1         0.35156  root default
-3         0.11719      host pve-node1
 0    hdd  0.05859          osd.0           up   1.00000  1.00000
 1    hdd  0.05859          osd.1           up   1.00000  1.00000
-5         0.11719      host pve-node2
 2    hdd  0.05859          osd.2           up   1.00000  1.00000
 3    hdd  0.05859          osd.3           up   1.00000  1.00000
-7         0.11719      host pve-node3
 4    hdd  0.05859          osd.4           up   1.00000  1.00000
 5    hdd  0.05859          osd.5           up   1.00000  1.00000
Every OSD must show up in the STATUS column. The CRUSH hierarchy places two OSDs under each host, which is how Ceph enforces that replicas land on different physical nodes.
8. Create an RBD pool for VM storage
A pool is where Ceph stores objects. An RBD (RADOS Block Device) pool stores virtual disk images. The --add_storages flag registers the pool as a Proxmox VE storage backend automatically.
8.1. Create the pool.
root@pve-node1:~# pveceph pool create rbd-pool --size 3 --min_size 2 --add_storages 1
Parameters:
--size 3— every object is written to three different OSDs (triple replication).--min_size 2— writes are still accepted if only two of three replicas are available. This allows the cluster to continue operating during a single node failure.--add_storages 1— registers the pool in Proxmox VE’s storage configuration so it appears in the web UI.
8.2. Verify the pool exists.
root@pve-node1:~# ceph osd lspools
Expected output:
1 .mgr
2 rbd-pool
The .mgr pool is an internal Ceph pool created during initialization. The rbd-pool is your VM storage pool.
8.3. Verify the storage appears in Proxmox.
Open the web UI at https://10.10.74.21:8006. Navigate to Datacenter → Storage. The storage rbd-pool must appear in the list with type RBD and status active. It is now available as a storage target when creating VMs on any node in the cluster.
9. Verify the complete cluster
9.1. Check overall health.
root@pve-node1:~# ceph -s
Expected output:
  cluster:
    id:     a1b2c3d4-e5f6-4a5b-9c8d-7e6f5a4b3c2d
    health: HEALTH_OK

  services:
    mon: 3 daemons, quorum pve-node1,pve-node2,pve-node3
    mgr: pve-node1(active, since 10m), standbys: pve-node2, pve-node3
    osd: 6 osds: 6 up (since 5m), 6 in (since 5m)

  data:
    pools:   2 pools, 161 pgs
    objects: 0 objects, 0 B
    usage:   150 MiB used, 360 GiB / 360 GiB avail
    pgs:     161 active+clean
The health line must read HEALTH_OK. All six OSDs must be up and in. All placement groups must be active+clean.
9.2. Check data distribution across OSDs.
root@pve-node1:~# ceph osd df
This command shows the raw capacity, data usage, and variance across all OSDs. On a fresh cluster with no data, the %USE column should be near zero and the VAR column should be close to 1.00 for all OSDs, indicating even distribution.
Note: With 6 disks of 60 GB each and triple replication (size 3), the raw capacity is 360 GiB but the usable capacity is approximately 120 GiB. Every byte written to the pool is stored three times on three different nodes.
Validation checklist
Confirm that your deployment meets all the following criteria:
| Component | Expected value | Verification command |
|---|---|---|
| Monitors | 3 in quorum | ceph mon stat |
| Managers | 1 active + 2 standby | ceph mgr stat |
| OSDs | 6 up, 6 in | ceph osd stat |
| Pools | rbd-pool (size 3) | ceph osd lspools |
| Cluster health | HEALTH_OK | ceph health |
| Raw capacity | 360 GiB | ceph df |
| Proxmox storage | rbd-pool visible | Web UI: Datacenter → Storage |
What this cluster enables
With Ceph deployed on all three nodes, your cluster now supports:
- Live migration. VMs stored on the
rbd-poolcan be moved between nodes while running. The storage is accessible from every node, so only the VM’s memory and CPU state need to transfer. - High availability. The HA manager can restart a failed VM on a surviving node because the VM’s disk data is already replicated there. No storage migration is needed during failover.
- Node maintenance without downtime. Before patching a node, migrate its VMs to another node. The RBD images stay on the Ceph pool, accessible from all remaining nodes.
You do not yet have HA configured. That requires creating HA groups, enabling fencing, and assigning VMs to the HA manager, which is covered in a dedicated article.
What this article does not cover
This exercise focuses on deploying a working Ceph cluster inside Proxmox VE. The following topics are addressed in separate articles or through our cloud and virtualization practice:
- CephFS for shared file storage (templates, ISOs, backups).
- Custom CRUSH rules for controlling data placement across failure domains.
- Erasure-coded pools for higher storage efficiency at the cost of write performance.
- Ceph performance tuning (BlueStore WAL, DB placement on NVMe).
- Adding or removing OSDs from a running cluster.
- Upgrading Ceph from Squid to Tentacle on an existing cluster.
- HA group configuration and fencing setup.
Sources: Proxmox VE 9 Administration Guide, Ceph on Proxmox chapter, pve.proxmox.com. EC INTELLIGENCE, Formation Administration Proxmox VE 9, Chapter 11, January 2026. Ceph Tentacle 20.2 release notes, ceph.io.