
This tutorial covers one module of our five-day Proxmox VE training. The full program takes you from a single node to a hyperconverged cluster with Ceph, high availability, and Proxmox Backup Server.
What this tutorial builds
Three Proxmox VE 9.2 nodes. One Corosync cluster with a dedicated network link. A verified quorum of three. That is what you will have at the end of this article.
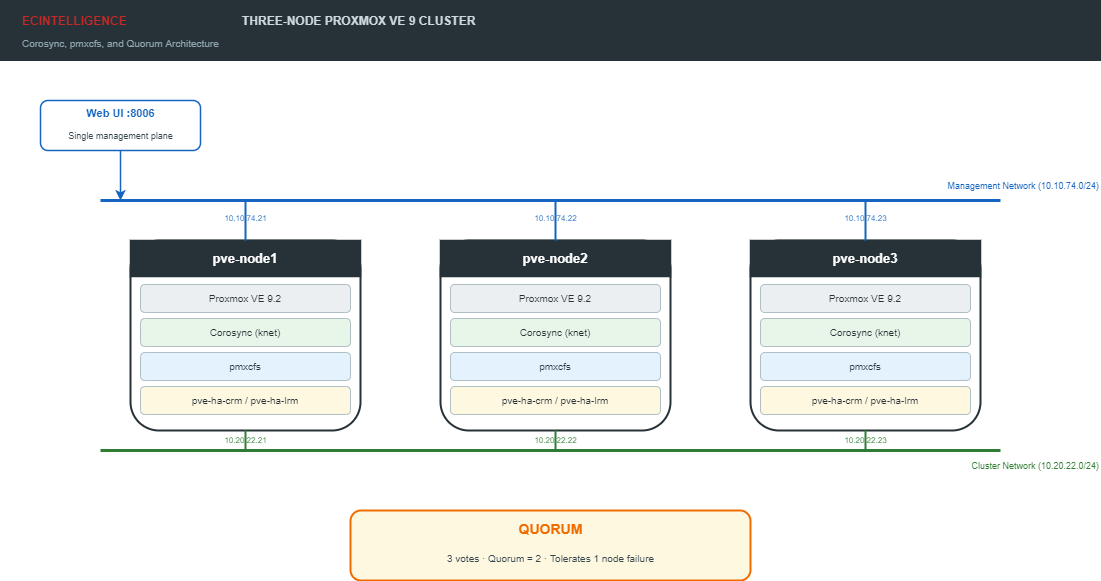
This cluster gives you centralized management: a single web interface to see all three nodes, synchronized configuration via pmxcfs, and the ability to manage VMs and containers from any node. It does not yet give you live migration or automatic failover — those require shared storage and high availability configuration, which are separate steps covered in dedicated articles.
Prerequisites
You need three Proxmox VE 9.2 nodes, each with a working installation and the no-subscription repositories configured. If you have not done this yet, follow How to Configure Proxmox VE 9.2 No-Subscription Repositories on each node first.
Each node needs two network interfaces: one for management (the web UI and SSH) and one dedicated to Corosync cluster traffic. The dedicated interface can be a physical NIC on a separate switch, a VLAN, or a virtual bridge on an isolated subnet. What matters is that Corosync traffic does not compete with VM traffic or storage I/O.
For this tutorial, the addressing is:
| Node | Management IP | Cluster IP (dedicated) |
|---|---|---|
| pve-node1 | 10.10.74.21 | 10.20.22.21 |
| pve-node2 | 10.10.74.22 | 10.20.22.22 |
| pve-node3 | 10.10.74.23 | 10.20.22.23 |
Replace these addresses with your own. The cluster network (10.20.22.0/24 in this example) must allow UDP ports 5405 through 5412 and TCP port 22 between all nodes.
Verify time synchronization
Corosync uses timestamps to detect heartbeat timeouts. A clock drift of more than a few seconds between nodes causes spurious fencing or split-brain conditions. On each node, verify that NTP is active:
timedatectl
The output must show System clock synchronized: yes and NTP service: active. If either line shows no, enable chrony:
systemctl enable --now chrony
Verify name resolution
Every node must resolve every other node’s hostname to its management IP. The simplest approach is to add static entries to /etc/hosts on all three nodes:
10.10.74.21  pve-node1.lab.local  pve-node1
10.10.74.22  pve-node2.lab.local  pve-node2
10.10.74.23  pve-node3.lab.local  pve-node3
Test from each node with ping pve-node1, ping pve-node2, ping pve-node3. All three must resolve and respond.
Create the cluster on node 1
Log in to pve-node1 as root via SSH. The pvecm create command initializes a new cluster. It generates the Corosync authentication key, writes the initial configuration to /etc/pve/corosync.conf, and restarts the cluster services. The --link0 parameter tells Corosync to bind to the dedicated cluster interface instead of the management interface:
pvecm create lab-cluster --link0 10.20.22.21
Expected output:
Corosync Cluster Engine Authentication key generator.
Gathering 2048 bits for key from /dev/urandom.
Writing corosync key to /etc/corosync/authkey.
Writing corosync config to /etc/pve/corosync.conf
Restart corosync and cluster filesystem
Verify that the cluster is running:
pvecm status
Look for three things in the output: Quorate: Yes, Nodes: 1, and the cluster name lab-cluster. Then confirm that both services are active:
systemctl is-active corosync pve-cluster
Both must return active. If either returns inactive or failed, inspect the journal before proceeding:
journalctl -u corosync -n 50 --no-pager
Join node 2
Log in to pve-node2 as root. The pvecm add command connects to an existing cluster member via SSH, retrieves the full cluster configuration, replaces the local /etc/pve directory, and restarts all cluster services. This operation is destructive for the joining node’s existing configuration: any local VM or container configuration files are replaced by the cluster’s synchronized copy.
Before joining, confirm that no VM or container on node 2 uses an ID that already exists on node 1. Conflicting IDs cause problems after the join.
pvecm add 10.10.74.21 --link0 10.20.22.22
You will be prompted for the root password of pve-node1 and asked to accept the SSH host key fingerprint. After authentication, the join process takes a few seconds. The output confirms each step: API connection, certificate generation, and service restart.
If the join fails with a connection error, check three things: that pve-node2 can reach pve-node1 on port 8006 (the API), that SSH on port 22 is open between the two nodes, and that the root account on pve-node1 can authenticate via SSH password. A common mistake is having PermitRootLogin set to no in /etc/ssh/sshd_config on the target node. Proxmox VE sets this to yes by default, but hardening scripts sometimes change it.
Verify from either node:
pvecm status
The output now shows Nodes: 2 and Expected votes: 2. The quorum value is 2 (the majority of 2 is 2), which means both nodes must be online to maintain quorum. This is a fragile state: losing either node loses the cluster. Adding the third node fixes this.
Join node 3
Log in to pve-node3 as root and repeat the same procedure:
pvecm add 10.10.74.21 --link0 10.20.22.23
After the join completes, verify from any node:
pvecm status
The critical numbers are now:
Nodes: 3Expected votes: 3Total votes: 3Quorum: 2
The quorum value of 2 is the majority threshold: at least two of three nodes must be reachable for the cluster to accept writes and manage resources. This is the defining property of a three-node cluster. One node can fail — hardware failure, kernel panic, network outage — and the remaining two still hold the majority of votes. They maintain quorum, keep pmxcfs writable, and can continue all cluster operations including HA recovery.
With only two nodes and no QDevice, any single failure loses the cluster entirely: one surviving node holds only one of two votes, which is not a majority. The cluster goes read-only, the web interface becomes partially non-functional, and no HA recovery can occur. This is why three nodes is the practical minimum for production clusters.
List cluster members explicitly:
pvecm nodes
All three nodes must appear with a numeric ID, their name, and an online status.
Inspect the result
The Corosync configuration file
The file /etc/pve/corosync.conf contains the complete cluster definition. It is synchronized automatically across all nodes via pmxcfs. Examine it:
cat /etc/pve/corosync.conf
The file has four sections:
- nodelist — one block per node with its name, numeric ID, vote count, and the IP address of its Corosync link (
ring0_addr). - totem — global cluster parameters: the cluster name, the transport protocol (knet on PVE 9), security settings, and a
config_versioncounter that Corosync increments on every change. - quorum — the quorum provider, always
corosync_votequorumin Proxmox VE. - logging — log level and destination (syslog by default).
One critical rule: never edit this file by hand unless you also increment config_version. If you forget, other nodes will reject the change as an older configuration version. The safe approach is to use pvecm or the web interface for all cluster modifications.
The web interface
Open https://10.10.74.21:8006 (or any node’s management IP) in a browser. Log in with root credentials from any node — all three share the same authentication database now. Under Datacenter, the left panel lists all three nodes with their resource usage. You can browse each node’s VMs, containers, storage, and network configuration from this single interface.
Try creating a test VM on pve-node2 while connected through pve-node1’s interface. The operation is dispatched to node 2 via the cluster’s internal API. The VM’s configuration file appears immediately on all three nodes under /etc/pve/qemu-server/, synchronized by pmxcfs.
Back up the cluster configuration
Before making further changes, archive the entire cluster configuration directory:
tar -czf /root/pve-cluster-backup-$(date +%Y%m%d).tar.gz /etc/pve/
Copy this archive to a location outside the cluster. If all three nodes fail simultaneously, this backup is the only way to reconstruct the cluster configuration.
What this cluster can and cannot do
With three nodes and Corosync running, you have:
- A single management plane. One web UI controls all three nodes, their VMs, and their containers.
- Synchronized configuration. Changes to
/etc/pveon any node propagate to all others within seconds through pmxcfs. - Quorum-based protection. The cluster locks itself to read-only when fewer than two nodes are reachable, preventing split-brain scenarios where two halves of the cluster make conflicting changes.
- Cold migration. You can shut down a VM on one node and start it on another, provided both nodes can access the VM’s storage.
You do not yet have:
- Live migration. Moving a running VM between nodes requires shared storage (Ceph RBD, NFS, or iSCSI) accessible from all nodes. Without shared storage, only cold migration with a full disk copy over the network is possible.
- Automatic failover. The HA manager can restart VMs on surviving nodes after a node failure, but only for VMs that reside on shared storage. HA configuration is a separate step that builds on top of the cluster and shared storage.
- Distributed storage. Each node still uses its own local disks independently. Deploying Ceph across the three nodes turns those local disks into a shared, replicated storage pool accessible from every node.
For most production clusters, the next step is to deploy Ceph on these three nodes. Ceph provides the shared storage layer that enables both live migration and high availability without requiring external SAN or NAS hardware.
What this article does not cover
This tutorial focuses strictly on cluster creation and verification. The following topics are covered in separate articles or through our cloud and virtualization engineering practice:
- Corosync dual links for network redundancy between cluster nodes.
- QDevice configuration for maintaining quorum in two-node clusters.
- Removing a node from an existing cluster.
- Deploying Ceph as the shared storage backend for the cluster.
- Configuring HA groups, fencing mechanisms, and automatic failover.
- Live migration prerequisites and step-by-step execution.
- The Proxmox VE firewall at datacenter, node, and VM levels.
Sources: Proxmox VE 9 Administration Guide, Cluster Manager chapter, pve.proxmox.com. EC INTELLIGENCE, Formation Administration Proxmox VE 9, Chapter 10, January 2026.